Tuesday, September 27, 2011

IT'S THAT TIME AGAIN.....TIME TO [EXPOSE] MYSELF

This past weekend marked the beginning of yet another round of fabulous challenges over at the [Expose] Yourself Project on Facebook.  I participated in the very first round and I really enjoyed [Exposing] myself ... more to me then to anyone else.  I loved that I was able to express myself & tell a story about who I am through my photographs. Generally speaking my art does portray me in many ways......but hardly ever is it directly about me.  So this was a great excuse indeed to get in touch with who I am once again.  It was nice for a change.   I was actually pleasantly surprised to find that I was serious enough about participating  that I hung in there and posted something for every single challenge, daily for 2 whole weeks!  That's a record for me,  I admit it...I've never really been the stick-to-it-ive kind of person.  I REALLY, REALLY have to love something [a lot]  to hang in there for an entire two weeks without being side-tracked into doing something different, forgetting, ignoring or just plain giving up.  
YIKES!  Someone throw me a towel....I feel naked all of a sudden! :] 


I'm all about being honest these days....being honest that is, with myself.  If I, myself,  do not acknowledge those cold hard facts about me...then there is no way that I will ever have the fortitude to change the unpleasant things about my personality that affect, mostly just me.  Yes, I've watch an episode or two of the good ole Dr. & while I am not a huge fan...I can appreciate applicable advice when I hear it!!   So onward and upward I go.   

I fully intend to participate every single day in this new set of challenges~ no matter how busy my life gets or how lazy I become....I am going to make every effort to hang in there and just doit!   You can doit too!  Meet me over at the Expose Yourself Project's wall on FB. If you are a female who happens to love taking pictures...then you qualify.  Being a pro is not a prerequisite for participation. No need for fancy equipment...a point and shoot cam is good enough . This challenge is about YOU~ not your camera or your skill level.  It saddens me to know that some women have opted out of participating because they felt that their work was not 'good enough' *Gasp*  That truly pains me.  We all  are as good as we TRY~ DO ~LEARN ~GROW~Become INVOLVED~ Quiet our FEARS and LEAP IN WITHOUT WARNING!!  It's not about being perfect...or Best...or even Better than most.....but rather taking the chance and just doing it!  There will always be someone better than you or I...learn something from them and keep moving forward enjoying YOUR OWN THANG!     Hope to see you there!!  *I may or may not have watch more than a couple of Dr. Phil's episodes...  :]~

Having said that....here are some images from challenge number 1a. The Pre Challenge, Challenge: [OFF] {Out Of Focus} <~~Much akin to me & my life at times :]  I do have an excuse...I am in fact  an artist! I think that basically gives me the right to be a little 'flighty' and 'unpredictable', no?! I say YES! ;]


Shot for the [Expose] Yourself Project.
Our first assignment to start things off is, Well...exactly that... OFF [Out Of Focus]
I did not have the heart to shoot this entire scene OOF so I brought just one little date back up in focus....because I
am not a follower do not take direction very well &also,  I have no self control whatsoeva! ha  I can admit that...it's not always such a bad thing. :]


I wanted to shoot something Fall-ish, [I don't have to explain my reason for this, I'm sure I've made my feelings clear on the Fall thing by now....and if you are a regular reader of mine (*insert huge belly laughs here) then you would certainly know that I am a FALL ADDICT!]   :] ... finding a pumpkin here in Cairo is next to impossible....sadly, no foliage or change of seasons to be had~ So I improvised and found a strand of beautiful dates.  Loving the orange/yellow/red colors that remind me of New England's fall leaves....and up close they do resemble the pumpkins I'm sure most of us are familiar with during this wonderful pre- snow season.  ♥K.


Friday, September 23, 2011

Fabulous Friday Crochet Fashion! :]

HAPPY FRIDAY!!! :]  I'm wicked excited for this weekend...mainly because the hubs is home and we get to spend some much needed QT together.  In that spirit, today's post will be short -Yet, VERY sweet.

A little sumin sumin I've been working on the past few days. 

Uni-sex Vintage Delivery Cap worked up in a gorgeous chocolate brown 100% Pure wool that is ohhhhh soooo soft and comfy.  I LOVE this so much thinking about making one for ME and The HUBS :] Crocheted in sizes: Newborn-Adult standard size.


Hand Crocheted Buttons adorn this beautiful piece, however I have a HUGE selection of 'real' and crocheted buttons to choose from that would look absolutely adorable on this as well. :]

Detail shot of my crocheted button design.

If you LOVE this....hit me up on my email at kekephotography at yahoo dot com for my price list, Size Chart & color palette choices

Tune in this Sunday for another fabulous blog on a few of my Photography Sessions over the last few weeks!  Til then, have a fabulous weekend!  I know I'm going to...woooo hoooo! 

♥K.

Wednesday, September 21, 2011

OFF THE HOOK DESIGNS by KeKe: An Update :]

Hello all of my beautiful craft loving friends. Have I mentioned to you just how much I absolutely LOVE Fall?  Well I'm mentioning again because I do...so much!  I am so glad it's finally here & I am literally attempting to cram all of my 'Fall' loving activities into the very short period of time we have  before Fall turns into Winter [which, don't get me wrong, I love equally as well...just for lots of different reasons].   There is something about breathing in crisp fresh air after a long hot & humid summer that makes one go "AHHHHHHH"!  

Speaking of AHHHHHH,  This weather has inspired me to create a few new warm and cozy crochet patterns. I've never actually written out a pattern to share~someday in the near future I just may do that.  I tend to jot things down  & erase [a lot] & jot down again,  in my little notebook as I crochet and re-crochet my patterns to perfection.  Much of the time this method works quite well for me.  There are times though that I do get frustrated and just give up the idea all together~ for a while anyway.  This past week though I seem to be on a creative roll [Thank God] and I like to think that it has something to do with FALL and the inspiration this season brings to me, personally. 


So while I am inspired I thought I would share a little something of what I've been working on over the past few days. [My crochet designs are lung and environment friendly creations & are always crocheted with in a clean and smoke free environment :]]

A New Creation added to my 'OFF THE HOOK DESIGNS TM by KeKe' [Copyright]
Cap & Flower Embellishment Designed  & Crocheted by Me: KeKe :]  Modeled here on a vintage glass eyed doll :]   This has a nice neat edge that took me a while to get down pat...but loving the results of my efforts. :]

Beautiful Soft Cotton Blend Fibers make this cap an adorable addition to any child's wardrobe. I may just make one for myself because it's that cute! At this moment in time I intend to crochet boys and girls caps in sizes: Preemie- 5/6 yrs.  Special requests for adult sizes are welcomed as well.  If you are interested in owning one of these beauties, contact me at kekephotography at yahoo dot com. for my color palettes  and price list  :] 

Detail shot of this adorable curly flower to add to my cap.  I'm going to use this same cap pattern a variety of ways & vary my creative embellishments.   Once I have a few made, I'll post up some new photos.  :] 


I still can not get over just how cute this is.  :]  Patting myself on the back. hehehee

If you happen to stop in my blog on accident or purpose, please leave me some love and let me know you were here.  If you like my stuff, you are more than welcomed to follow me and join in the fun.  If you are a fellow blogger, feel free to link me to your page.  I love meeting other artistic and creative folks.  Show me what you do :]
Peace!  K.

Thursday, September 15, 2011

TUTORIAL # 3: Photoshop All About Vectors


Vector Vector My Protector......

Well ok, maybe not but it rhymes and it sure does make my Photoshop life a whole lot less complicated...Plus it's Fun & Effective! What more could a girl with a camera and tons of post production editing to complete before the end of this day.. ask for?!

Why Yes, I did create a new brush for this tutorial...thank you for noticing. :]  This represents me on a good day. :]~

Last tutorial we parted right after sharpening. How rude!  Lets jump right into learning how to Vector Paint.  This is probably the single most useful PS action I have learned thus far. It saves a lot of trouble trying to achieve a lot of 'something' in some areas of an image while not so much 'something'  is needed in other areas.
 * Something = Sharpening, color adjustment, other adjustment layers.... and so on..


Lets begin with yesterday's image exactly where we left off. Well not exactly because I have brought it back to the point where we added that 'High Pass Filter' & then shot the radius up a bit just for tutorial presentation purposes. This image is clearly over sharpened on purpose,  as we notice that 'halo' effect going on which is hardly ever an effect we are going for...but in this case it serves a visual cause :]


We really want to sharpen this image so that we can reduce some of the opacity levels on some of the image while allowing other areas to have the benefit of the full strength sharpening.


With our layers still visible [not merged or flattened] we will add a Vector mask [the camera icon].
hit the 'B' key on our keyboard to make our brushes palette visible, Choose a soft brush from the brush palette, drop the opacity level between 25-30 or whatever gives you the best results. Don't be afraid to paint with a higher opacity brush. Be sure that your background/foreground colors are default [black and white] by clicking [SHIFT +"D"] Black should be your foreground color.  Be sure as well that you are working with the newly created vector mask by clicking on it.  You will notice a little highlighted box around the vector, this means it is an active layer...this is a good thing because it's what we are aiming for & want to be working with  :]

Add a Vector Mask to your background layer by clicking the 'camera' icon at the bottom of our PS.  Choose a soft round brush from your brush palette and set your  brush opacity level to a comfortable level


Now the fun part.  Paint any and all areas that you want to be less sharp.  You can change your brush opacity for different areas of your image that you may wish to be a littl more or less sharp.  You can also switch your forground color to white by clicking the letter 'X' on your keyboard & proceed to repaint areas on your image that you may have inadvertantly reduced in sharpness.  Experiment...practice and Enjoy. It's a simple little PS action but it brings great big results. 


Do you have a vector  tip or trick you'd like to share?  Feel free to share yours or post a link to your results. I love learning anything PS.  Peace. K.  & Remember, If I know it~I'll Show it! ♥

Next up: BE AWARE!  CONTENT AWARE THAT IS!

**Visit me soon for more fabulous rants and Photoshop Tips brought to you by...Me. .... KeKe.

Tuesday, September 13, 2011

Photoshop Layers & Masks Tutorial [#2]

Who doesn't love Layers and Masks?!  Who doesn't know a thing about them?  Who wants to learn more?

Upon satisfactorily  tweaking an image in Camera Raw (I will post up a Camera Raw Tut. at a later date...although you may have to remind me because I'm not getting any younger here!)~

Anywhoo...back to my tutorial.    First things first.  Be sure that your PS "Point Sample" is set at either 3X3 or 5 X 5 average pixel sample. To do this Locate and click on your eyedropper icon.  A little box will appear at the top of your PS.  Click it to change and reset your point sample..
TO LOCATE YOUR EYEDROPPER TOOL: 
Note: It may very well be hidden under the 'Ruler' tool, in which case you can right click directly on the 'Ruler' icon which brings you to a list of options...in this case of course you will choose the eyedropper tool.

I've set my sample at 5X5 as my image is quite large.


So I open into Photoshop for some last detail edits,  a lovely image of a flower I shot in Cairo, Egypt. I actually stopped on the side of a highway to capture....call me crazy, but I enjoy an occasional highway drive by or pit stop scare in order to 'Make a Picture'  from something that just so happens to catch my eye.  The lighting was perfect, the sky blue and layered with puffy white clouds. I just had to do it. So I stopped to shoot it :]


***I actually did not edit this particular image in Camera Raw for tutorial quality purposes I've decided to edit entirely  in Photoshop so that I can show you the fantastical-ness  [if that is even a word] of layers and masks :]
Once your image is opened in Photoshop right click on the background thumbnail & choose 'CONVERT TO SMART OBJECT'. This will prevent compromising the quality of your original image as you edit and make changes. 


Your background layer thumbnail will automatically rename itself to 'Layer 0'  You can change the names of your layers simply by double clicking on the spot where it reads 'Layer 0' :]
I'm leaving mine the way it is...because I'm feeling a little lazy...but if you are feeling more creative and want to re-name your layers...go for it!  It's actually a better practice to rename your layers if you are working with several layers in your edit.  This way you are clear which layers are for which edits. 

Let's have some fun with our 'Layers' :] 
I'm thinking maybe we should work on our White balance and correct any color cast that our image happens to have.  Let's brighten things up before moving on to other fun stuff PS has to offer.

Duplicate Layer "0" by dragging and dropping the entire layer into 'Create a New Layer' Icon at the very bottom or your PS workstation. [This icon is a small square within a larger square]


Notice there are two identical layers now in your tray.
You can actually turn off the very bottom layer by clicking on the 'eye' icon. In this way your original image is preserved.


Personally I like to disable an original layer it serves as a visual marker to view the progress of my edit as well as make quick changes without having to go back through all the steps (I can just drag and dump the unwanted edit).  There are other ways to keep track of your edits...and I will blog on that at a latter time.  Again, a reminder would be helpful. :]


Working with your visible layer (be sure this layer is highlighted, which indicates the layer is active).

click on the the Two toned, moon shaped icon located at the very bottom of your PS workstation. Clicking this icon will open a list of editing layer options.  Generally I begin my editing PS phase with a 'Threshold' adjustment to locate the images darkest and lightest areas. 
Selecting the Threshold option will add a New 'Adjustment Layer' to your Tray


Once your threshold Layer is visible you will notice your image has change quite a bit.  Don't be alarmed we are simply adjusting and balancing out our colors & things will return to normal...well a better version of normal shortly.


Slide the middle slider all the way to your left. Your image will now be completely white.
Click and hold down your 'ALT' Key while slowly sliding the arrow back toward the center.
Once you see the slightest bit of black coming through stop sliding. You have found the darkest part of your image. Yay! :].  We need to mark this for adjustment sake.


You may need to zoom [Z on our keyboard]  in to ensure that your marker lands directly inside one of the little black squares :] 

Go ahead and grab that little eyedropper tool found on your left hand side panel. Probably no longer hiding behind the ruler tool since we've already used it to set our point sample.  Ahhh but ..there are two of em?  I know. :]  Doesn't matter which one you use..as long as it's an eyedropper shape :]


Using the eyedropper tool you will now hold down the 'SHIFT' key while clicking on one of those black squares.  Wallah.....you've marked your blackest black  & can now move on to finding  your whitest white :]


Head on back to your Threshold layer (if for some reason your threshold layer disappears from view just double click on the Threshold Layer in your layers pallet) <~~Sound confusing?  Sorry I don't know how else to say it other than post up this image to clarify ;}~


Again using the slider you will bring the center white arrow all the way to your right [..EH it's worth mentioning here to be sure your image is no longer zoomed in close (right click directly on your image and select "Fit On Screen")..which will put things nicely back into place.] :]
Once again, Click and hold down your 'ALT' Key while slowly sliding the arrow back toward the center until a little peep of white shows through. At which point you will stop sliding and grab that eye dropper tool once again to mark this point (Whitest White). Zoom in if that helps you to select within the area of white. click and hold down the "Shift" Key while selecting your point.


Head back to your layers pallet and you can now drag and drop into the little trash can icon,  your Threshold layer as it is no longer useful. You are only trashing the layer mask, not the points...  We now  have our White and Black points marked.  Now lets find that grey area.  :]

Who's excited?!  :]  You know you are! So am I!

My Excited Face Brush, created just for today's blog post.  YAY! :]


Reset your image to fit on screen. [right click>Fit on Screen]  We want to see our entire workspace.

Select the "Create a New Layer" Icon located on the bottom of your PS work area.  It is the square shaped icon that has a smaller square on the left bottom corner.

We are going to fill this layer with 50% gray.  To do this head on up to "Edit" at the top of your PS. & select "FILL" from the drop down list. Under "Contents" Select the  "50% grey" Option.  If your image turns completely grey...you doing great! :]


Change the 'NORMAL' blending mode [located under your layers pallet] confusing?!  ...I know! Gotcha....picture time. :]
change the 'Normal' blending mode setting to 'Difference'.......


...which will turn your image into a psychedelic wonder :]  Too bad it's not going to stay this way for very long...I'm kinda digging it :]
Groovy Man.


We will now add an additional Threshold adjustment layer by clicking the adjustment layer icon found on the bottom of your PS work area.  The same icon we've selected previously  :]

Again we will slide the middle white arrow all the way to your left and slowly bring it back to the center until you see the very first hint of black showing through.  You have located your grey area and now you will have to mark this spot the same way you did the black and white areas.  Select your eyedropper..Click and hold the 'Shift" key down while clicking the dropper on the black square.  Zoom in if need be.
You have located and marked your grey area. 

Fit your image back into view by zooming out.  You may now drag and drop  your Threshold layer as well as your Layer 1 layer [the layer that turned your image all funky looking] directly to the trash can icon at the bottom of you PS work area. 

We are now left with two layers.  Our original layer "0" which is not visible & our copy of layer '0" which is visible.   Notice the three little markers left behind?  Lets have some fun before we make them disappear :]

We will need an additional "New Adjustment Layer". Remember the black and white circle icon on the bottom of your PS work area?  Click it :]  Select "CURVES".  A curves box will appear..which is always a good thing :]  Especially when that is exactly what you want to happen.  :]


Notice there are three eye dropper icons on the left hand side of this curves box.  Select the very first one (black).  Click your 'CAPS LOCK' so that your dropper changes into a 'bulls eye' icon (this makes for better placement and it's just easier in my own humble opinion)


With your black dropper now turned bulls-eye..ZOOM in if you feel that will help with placement and click that bulls-eye directly over marker number 1.  Now choose the very last dropper (White) and perform the same steps on marker number 2.  Last choose the middle dropper (grey) and click the bulls-eye on marker number 3.

You should notice a wonderful change to your image.  Colors should be balanced out a bit. Things should look a little brighter.


You are probably wondering if you are going to be stuck with those three little markers forever?  Nah...wanna get rid of em?  Head on to where you located your dropper and select the color sample tool from the drop-down menu.  A little box should appear at the very top of your PS that says "CLEAR".  Click that & like magic...those little buggers disappear.

Heading back to your layers pallet you can now merge your layers by clicking on your 'CTRL + E' keys on your keyboard or LAYER>MERGE LAYERS. 

At this point you can make other adjustments to your image. If you would like to balance your colors out a bit you can select a new 'color balance' adjustment layer. Whatever you do, use an adjustment layer...it's more organized as well as image friendly.  I will go into a little more detail about this in future blog post.   My image looks in need of a little brightening/Sharpening...but other than that I am pretty happy with the results made just by finding the white, black and greys and balancing everything out.

Perhaps the sky will look more appealing a little darker?  Lets try to achieve that.
Drag and drop the background layer to the 'New Layer' icon located at the bottom of your PS.
[big square/little square] icon.
Let's see what things look like if we Change the blending mode from 'NORMAL' to 'MULTIPLY'


While I love this affect I think perhaps the flower could use a little less Multiplicity.  EEEK dilemma?  Nope.  Lets work through this.

Let's change our blending mode back to "NORMAL" and select our "Quick Selection Tool" from our side tool bar.


Click and drag around the perimeter of the flower (or whatever it is in your image you do not want to include when changing blending modes). Your selection will be indicated by those marching ants


Click the "REFINE EDGE' icon at the top of your workstation & Feather & smooth a bit. Press OK


Right click on your image and select 'SELECT INVERSE'~
Now change your blending mode to 'MULTIPLY'~
Here is where you will see that your selected areas change back to the original form
Create a NEW VECTOR MASK found at the bottom of your PS next to the half moon icon we selected previously.  This icon kinda looks like a little camera :]

Wahlah a little Photoshop Friendly Vector Mask Magic! 
<~~Ok so I made that up.  I'm an artist, I can do those types of things. :]~

How's your image looking now?  Mine is just about where I want it. Although....I think still it could use a little Sharpening.  Lets Do that Shall we? :]
I will merge my layers once again.  You remember how to do that right? .... [CTLR + E] on your keyboard.  or you can click on LAYER>MERGE LAYERS. Which ever floats your boat.  :]


If you intend to resize your image...do so before sharpening...without getting into the particulars, it just looks much better and lessons the chances of getting that 'halo' affect. 

I've resized my image to 930Pixels [FB Resizing adjustment] I learned the hard way.
To re-size your image simply click on IMAGE>RESIZE IMAGE> A box will appear where you can place your pertinent information.


Now lets Sharpen :]

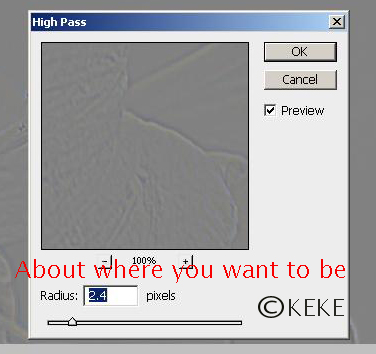
Copy your background layer [Drag and drop into the new layer icon at the bottom of your PS]
FILTER>OTHER>HIGH PASS  A 'RADIUS' box will pop up.  You will want to slide the arrow to the point where you can just barely make out the image behind the grey area.  If you see a halo effect going on such as in the image below, you've gone a little too far.  Find that delicate balance where you see the outline but no halo.  When you find that wonderful balance, click OK.


Gone too far


Just about right


Change your blending mode to either: Soft Light, Hard Light or Overlay.  I generally go with "overlay' because it's not very soft, yet not too harsh where details in other areas of my image are blown out.  If you so happen to like that affect, then go for it ...you can always lower the opacity or add a magic vector and paint over the areas that you do not want to sharpen quite as much. I will cover Vector Mask Painting in my PS Tutorial #3 which will be posted up tomorrow. 


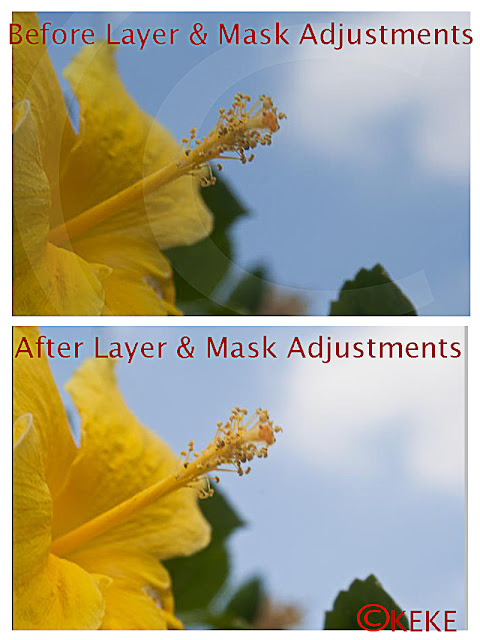
A before and After shot.  I will continue to edit this same image in my next tutorial: Vector Masks and Painting Fun :]

Be sure to visit me again for future fabulous Photoshop Tutorial brought to you by....Me. KeKe. :]

Until then I hope you find this tutorial helpful. Remember practice makes perfect.  Once you get the steps down, things just naturally progress rather swiftly.

Learning Photoshop is a beautiful thing. Wouldn't you agree?!

Peace and Love, K

***If you get stuck at any point during this tutorial or have any questions, comments or suggestions  please do not hesitate to drop me a note right here in the comments section.  I will answer any and all questions, consider your suggestions for future tutorials and generally help you along the way. If I know it, I'll show it....  After all....
Sharing is Caring ♥


Sunday, September 11, 2011

Photoshop [cs5] Brushmaking ♥

As promised I have decided to dedicate a few minutes this morning to a little blog tutorial on how I create my own personal brushes for Photoshop. 
But before I actually get down to the days usual bees knees........

♥I would like to take a moment and mention that today is the 10th year anniversary of the tragic events that took place in New York City where 2,819 innocent people from 115 Nations perished.  343 Fireman/Paramedics, 23 NYPD, 37 Port Authority Officers gave their lives saving others.  In memory of all those who lost their lives my online and 'real life' activities will remain silent from the hours of 8:46am until 10:28am, which was the time the 1st plan hit until the last building fell. ♥K.  9.11 always remembered


& Now back to brushes :]  
***Please note that any and all shortcuts referred to in this tutorial are for Window users as that is my current workspace. If you Mac it, you will find tons of shortcut key charts online for mac users. :]

*Please keep in mind that [one] I am fairly new to Photoshop and all it's glorious capabilities.  [two] I am self taught in the mysterious ways of this Photoshop world.  &[C] I work with version CS5.......and so with my limited knowledge and expertise............I share with you a little self taught brush wisdom:


You can turn almost any image into a PS brush. In this tutorial I will be using an image that I shot, but you can also create brushes using drawings or just about anything else. 
You can also created some awesome watermark brushes for personal as well as business use.  

My Crochet Business Logo designed with my very own brush design.


The very first thing you will need to understand....and I am saying this because I want to save you the time it took me to figure this out.  I would hate to have you go through the same experience of staring blankly at your computer monitor for 20 minutes trying to understand why all of your Photoshop buttons are greyed out. So first things first.
 
SIZE MATTERS:  You can create brushes up to 2500px. [as far as my understanding of version CS5~this may differ where other versions apply]   If you attempt to create anything larger than that Photoshop will automatically block you from ever using your PS program again...OK that was an exaggeration, but it's the reason some of the pertinent buttons were grayed out on my  program & also the reason why I had to resort to using an entire bottle of Visine to get the red out. :]~


To begin sizing your canvas you want to start with selecting the FILE.>NEW  button at the top of  your PS
 Doing so will bring you to a popup window where you will then place pertinent information on size and color of your canvas. Note I have set mine up in the 'Grayscale' mode. You do not necessarily have to do the same and can create your brush using a color photo.  It's all a matter of preference.  Eventually PS will convert your color image into a grayscale version as the actual brush.
The following is what your canvas will look like before we begin adding the image [of your choice] in this case a beautiful ball of yarn I shot just for this very special occasion :]  It's worth noting here that I have edited my yarn image to the very best quality in order to highlight all the areas of interest that I wish to appear as part of my brush~within the image. Eventually I plan to post up some editing tuts....but for now I will assume that your image is already edited for optimal PS Brush Making quality. This will include but not limited to 'Contrast/Brightness' 'Black/White' 'Curves'...and all that other good stuff found on your PS


To enter your image of choice onto your canvas you will open from the FILE>OPEN option at the top of your PS work station.  Once your image is opened you will then highlight the areas of your image you wish to include as part of your brush.  You will now select the 'MAGIC WAND' tool [Or 'W' on your keyboard] & click on the areas of interest.   In my case, I will select (by way of little marching ants) my yarn creation. :]


In order to select all of the areas you can click and hold down your shift key on your keyboard as you are selecting the areas.  be sure to clean up your edges and include every pixel involved :]

Once you are satisfied with the location of your marching ants~You will now proceed to cut and paste.  To do this select 'EDIT>CUT' from your ant infested image :] and head on in to paste into your empty canvas by selecting 'EDIT>PASTE'.
Merge your image into your canvas by clicking 'CTRL + 'E' keys on your keyboard.


If you've set your original canvas to 'Grayscale' your image will now appear in your canvas in the gray-scale mode. I've reverted my image back to it's original color for tutorial quality purposes.    You can now save & close [if you so choose] your original image and work directly with your brush prep canvas :]


With your image now sitting snugly within your canvas click on 'EDIT>DEFINE BRUSH PRESET'
Name Your Brush :]

Head on into your brush presets where you should find your very own original newly created brush ♥


I hope this tutorial brightens up your day just a little bit.  It's always a good thing knowing you created something pretty awesome for you by
YOU :]♥♥♥♥
Have fun with it :] Create it! Appreciate it!  Share it!

Peace and Love,
K.


*If you happen to be aware of an easier or more effective way to create PS brushes or if any of my steps within this tutorial are incorrect or unclear please do not hesitate to leave a comment and we will work this out together.  :]  Likewise, if you happen to like what you see here please leave a little love.  Remember I am still on my learning journey and I'm willing to share whatever little bit of Photoshop knowledge I gain along the way.  If there is something Photoshop you would like to learn, please feel free to drop me a note right here ...If I know it, I'll show it! ♥   :]   
K.